Hp Officejet Pro 8500a Paper Continues to Jam
Z7_3054ICK0KGTE30AQO5O3KA30N0
hp-concentra-wrapper-portlet
![]() Actions
Actions
A 'Paper Jam' Message Displays for HP Officejet Pro K8600 and K8600dn Color Printers
Issue
The product stops printing and the error message 'Paper Jam' displays on the computer.
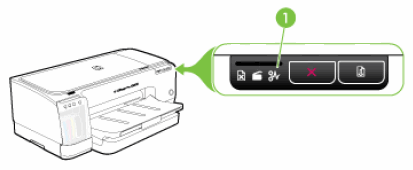
The Paper Jam light on the product might also turn on or blink to indicate a paper jam.
Figure : Paper Jam light on the product Paper jam light
 IMPORTANT: You must follow these steps in the order presented to resolve the issue.
Solution one: Clear the paper jam
Follow these steps in the order presented to resolve the paper jam.
Step one: Remove loose paper from the tray
Remove any loose sheets of paper from the input tray and the output tray.
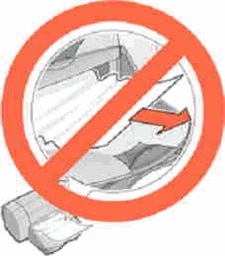
caution:Do not remove jammed paper at this stage. Trying to clear jammed paper from the front of the product can damage theprint mechanism.
| Remove any loose paper from the paper tray. | Do not pull jammed paper from under the front cover |
| | |

Step two: Clear the paper jam from the rear of the product
Follow these steps to clear the paper jam from the rear of the product.
caution:Never lift the front cover and pull paper out from the inside the product if you can pull it from the back of the product. Pulling paper from inside the front cover can cause mechanical damage to the product.
-
Press the Power button (
 ) to turn on the product.
 -
Push the button on either side of the rear access panel or the duplexer, and then remove the panel or duplexer.
Figure : Remove the rear access door or duplexer

-
Find any jammed paper inside the product, grasp it and then pull it out towards you.
Step three: Clear the paper jam from the duplexer
-
Push in the tabs on the duplexer to remove the duplexer cover.
Figure : Remove the duplexer cover

-
Check the duplexer for jammed or torn bits of paper. Remove any jammed or torn paper you find.
-
Replace the duplexer cover, and then make sure that the cover snaps securely into place.
-
Reinsert the duplexer into the rear of the product.
Step four: Clear the paper jam from the front of the product
Remove the jammed paper from the front of the product.
caution:Remove the paper carefully. If the paper tears, part of it might remain inside the paper path and damage the product. Carefully remove all traces of paper that you can find.
-
Make sure that the printer is on.
-
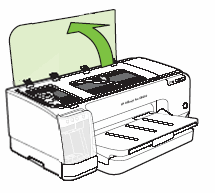
Lift the output tray.
Figure : Lift the output tray

-
Check for jammed paper. If you see jammed paper, gently pull the paper out towards you.
Figure : Remove jam from the output tray

-
Lower the output tray.
-
Raise the top cover, and then press and hold the Resume button (
 ) until the carriage moves to the left.
Figure : Raise the top cover
-
Wait for the carriage to stop moving, and then unplug the power cord from the rear of the product.
-
Gently pull out any jammed paper.
-
Make sure that there are no scraps of paper stuck between the rollers.
-
Close the top cover.
-
Reconnect the power cord to the rear of the product.
Step five: Print a self-test page
Follow these steps to print a self-test page.
-
Load unused, plain white, U.S. letter or A4 size paper in the paper tray.
-
Press and hold the Power button (
). -
Press the Cancel button (
 ).
). -
Release the Power button (
) and the Cancel button (). The self-test page prints. Figure : Example self-test page

-
If these steps resolved the issue, and the self-test report prints, there is no need to continue troubleshooting.
-
If the issue persists, continue with the next solution.
-
If the self-test report does not print, continue with the next solution.
Solution two: Clear the jam from the tray
Step one: Check the tray
-
Make sure that the product is on.
-
Lift the output tray.
Figure : Lift the output tray
-
Check the main tray for jammed paper or bits of torn paper.
-
Remove any jammed or torn paper you find.
-
Lower the output tray.
Step two: Print a self-test page
Follow these steps to print a self-test page. Printing a self-test report verifies if the hardware functions correctly.
-
Load unused, plain white, U.S. letter or A4 size paper in the paper tray.
-
Press and hold the Power button (
). -
Press the Cancel button (
). -
Release the Power button (
) and the Cancel button (). The self-test page prints. Figure : Example self-test page
-
If these steps resolved the issue, and the self-test report prints, there is no need to continue troubleshooting.
-
If the issue persists, continue with the next solution.
-
If the self-test report does not print, continue with the next solution.
Solution three: Check the carriage path and reseat the printheads
There are multiple compartments in the product where paper can jam. Use the following steps to check for obstructions in these locations.
note:The following image might not look exactly like your product, but the steps are the same.
The service station (compartment 3) cannot be accessed from outside the product. Do not try to remove the cover from the service station (compartment 3).
Figure : Compartments inside the product Printhead access area (compartment 1) Main paper path access area (compartment 2) Service station (compartment 3)

caution:Do not remove the printheads when the carriage is in the main paper path access area (compartment 2), or in the printhead service station area (compartment 3).
Step one: Check the printhead access area (compartment 1) and the main paper path access area (compartment 2)
-
Press the Power button (
) to turn off the product. -
Disconnect the power cord from the rear of the product.
caution:
You must disconnect the power cord to move parts by hand without the risk of an electrical shock.
-
Raise the top cover.
Figure : Raise the top cover
-
Check compartments 1 and 2 for jammed paper or bits of paper. Remove any jams or bits of paper.
caution:
Use a flashlight to check the carriage path thoroughly for torn pieces of paper that might remain inside the product. If any torn pieces of paper remain inside the product, more jams are likely to occur.
-
Close the top cover.
-
Reconnect the power cord to the rear of the product.
-
Press the Power button (
) to turn on the product.
Step two: Check the service station (compartment 3)
-
Raise the top cover.
Figure : Raise the top cover
-
Press and hold the Resume button (
 ) until the carriage moves to the printhead access area (compartment 1) on the left side of the product. Wait for the carriage to stop and become idle.
 -
Disconnect the power cord from the rear of the product.
caution:
You must disconnect the power cord to move parts by hand without the risk of an electrical shock.
-
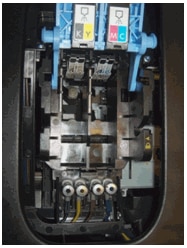
Looking through main paper path access area (compartment 2), check the service station (compartment 3) for any paper or object that might restrict the carriage.
Figure : Example of paper that could restrict the carriage

note:
You might need a flashlight to illuminate areas for proper viewing.
-
Remove any crumpled or jammed paper from the service station (compartment 3).
-
Reach inside the main paper path access area (compartment 2), and then manually move the carriage.
-
Make sure that the carriage can move freely across the width of the product by gently pushing the carriage to the left, and then to the right.
-
Close the top cover.
-
Reconnect the power cord to the rear of the product.
-
Press the Power button (
) to turn on the product.
Step three: Check the carriage, and then reseat the printheads
-
Raise the top cover.
Figure : Raise the top cover
-
Press and press and hold the Resume button (
) until the carriage moves to the printhead access area (compartment 1) on the left side of the product. Wait for the carriage to stop and become idle. -
Lift the printhead latch.
Figure : Lift the printhead latch

-
Lift a printhead handle, and then use it to pull the printhead out of its slot.
Figure : Remove the printhead

-
Repeat these steps to remove the other printhead.
caution:
Do not leave printheads out of the carriage for more than five minutes.
-
Check the inside, sides, and underside of the carriage for any debris or bits of paper.
Figure : The carriage
-
Reinsert each printhead into its color coded slot. The label on the printhead must match the label on the printhead latch. Press down firmly on the printhead to make sure that contacts the carriage correctly.
Figure : Insert the printheads

-
Pull the printhead latch all the way forward, and then press down to make sure that the latch engages. You might have to apply some pressure to engage the latch.
Figure : Close the printhead latch

-
Close the top cover.
-
The product might go through a warm up period, and then an alignment page prints.
-
If the alignment page prints successfully, there is no need to continue troubleshooting.
-
If the alignment page fails to print, continue with the next solution.
-
Solution four: Clean the paper rollers
Follow these steps to clean the paper rollers inside the product.
Step one: Clean the rubber paper feed rollers
-
Press the Power button (
) to turn off the product. -
Turn the product so that you can access the rear side.
-
Disconnect the power cord from the rear of the product.
-
Remove the rear access door or automatic two-sided printing accessory (duplexer). Press in the latches on the rear access door, and then pull it away from the product to remove it. If the product has a duplexer, press the buttons on the sides of the duplexer, and then pull it away to remove it.
Figure : Remove the rear access door or duplexer
-
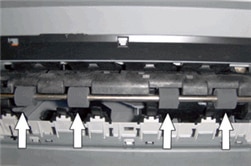
Wipe the rubber paper feed rollers with a lint-free cloth lightly moistened with distilled or bottled water. Rotate the rollers up carefully to clean all the way around.
Figure : Rubber paper feed rollers
-
Make sure that the rollers on the rear access door or duplexer are clean and in good condition. If any are missing, stuck, or loose, replace the rear access door or duplexer with a new one.
Figure : Rear access door rollers

Figure : Duplexer rollers

-
Allow the rollers to dry completely, and then replace the rear access door or duplexer.
-
Slide the door or duplexer into place, and then gently push it in until it clicks or snaps into place.
-
Reconnect the power cord to the rear of the product.
Step two: Print a self-test report
Follow these steps to print a self-test report. Printing a self-test report verifies if the hardware functions correctly.
-
Press the Power button (
) to turn on the product. -
Press and hold the Power button (
). -
While holding down the Power button (
), press the Cancel button () four times. -
Release the Power button (
).
Solution five: Perform a power reset
Follow these steps to reset the product.
Step one: Perform a power reset
-
With the printer turned on, disconnect the power cord from the rear of the printer.
-
Unplug the power cord from the wall outlet.
-
Wait at least 15 seconds.
-
Plug the power cord back into the wall outlet.
-
Reconnect the power cord to the printer.
-
Turn the printer on.
Step two: Print a self-test page
Follow these steps to print a self-test page.
-
Load unused, plain white, U.S. letter or A4 size paper in the paper tray.
-
Press and hold the Power button (
). -
Press the Cancel button (
). -
Release the Power button (
) and the Cancel button (). The self-test page prints. Figure : Example self-test page
-
If these steps resolved the issue, and the self-test report prints, there is no need to continue troubleshooting.
-
If the issue persists, continue to the next solution.
-
If the self-test report does not print, skip to the next solution.
collinsdoingunt93.blogspot.com
Source: https://support.hp.com/us-en/document/c01289431
0 Response to "Hp Officejet Pro 8500a Paper Continues to Jam"
Post a Comment